Building an OS Image
This chapter covers the following topics:
Introduction
QNX is a modular operating system composed of a microkernel and one or more processes that provide services. For example, the process named Fsys provides filesystem services, the process named Net provides network services, and so on.
When you build an operating system image, you select the services that you want to be available immediately after boot, and include the processes that provide those services into a custom-built operating system image. You create this image with the buildqnx utility. The image can be booted from disk by the QNX partition loader or booted over the network using the netboot utility.
Constructing a build file
The buildqnx utility takes a text file containing a list of process names as input and produces a binary image file containing these processes as output. The input file is called a “build” file. The build files are kept in the /boot/build directory and the image files are kept in the /boot/images directory.
You can create an image for any node by invoking buildqnx directly or by using the make utility and the Makefile in the /boot directory. For example, you could enter either of the following command sequences to create an image file called hard.1 from the sample build file hard.1:
cd /boot
buildqnx build/hard.1 images/hard.1
OR
cd /boot
make b=hard.1
Build file format
Each program you want included in the created image occupies three lines in the build file. The first line is the pathname of the program you want included. The second line starts with a $, followed by an initial heap size value of 1, followed by a command. The third line must be blank to separate one entry from the next.
Here's the sample build file hardata.1:
sys/boot
$ 1 boot -v

sys/Proc32
$ 1 Proc32 -l 1

sys/Slib32
$ 1 Slib32

sys/Slib16
$ 1 Slib16

/bin/Fsys
$ 1 Fsys

/bin/Fsys.ata
$ 1 Fsys.ata

/bin/mount
$ 1 mount -p /dev/hd0 /dev/hd0t77 /

/bin/sinit
$ 1 sinit TERM=ansi
Setting heap sizes
The number after the $ symbol sets the initial heap size. A value of “1” will cause the heap size to grow dynamically as needed.
Setting priorities
You can reduce the initial priority of a process by following the heap size value with an optional :nn argument, where nn is the desired priority. For example, the following would start the floppy driver (Fsys.floppy) with a priority of 8:
/bin/Fsys.floppy
$ 1:8 Fsys.floppy
Setting the priority lets you control the order in which processes start up.
Where to find modules
QNX modules are stored according to the kind of services they provide. The following diagram gives an overview of the general directory structure in a typical QNX installation:
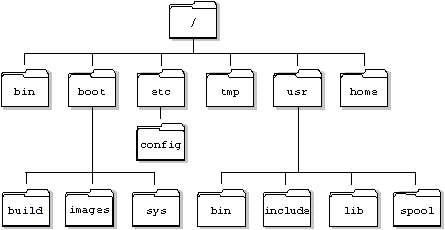
| To find: | Look in: |
|---|---|
| system executables | /bin |
| OS image Makefile | /boot |
| build files to make images (the make utility reads these) | /boot/build |
| OS image files | /boot/images |
| system processes needed at boot time | /boot/sys |
| initialization and other files | /etc |
| sysinit and configuration files | /etc/config |
| software release information files | /etc/readme |
| technical notes | /etc/readme/technotes |
| default location for temporary files | /tmp |
| more executables | /usr/bin |
| header (*.h) files for the C compiler | /usr/include |
| libraries for the C compiler | /usr/lib |
| terminal capabilities files | /usr/lib/terminfo |
| installed QNX applications | /usr/lib/application |
| work files for system spoolers | /usr/spool/lp |
| a user's home directory | /home/userID |
Selecting processes for an image
The processes you include in an OS image are determined by several factors. You can typically group images into three classifications:
- images loaded from disk
- images loaded over the network
- images loaded into embedded systems
The boot process (/boot/sys/boot) is always inserted into the first line of the generated image automatically, even if it isn't specified. If you need to supply options to sys/boot, you must add the line “sys/boot” to the build file as the first process.
For images loaded from disk or over the network, you can start most processes after booting. You do so by placing their command lines in the system initialization file that QNX executes after boot (see “The system initialization file” in the Basic Installation chapter). This lets you keep the boot image small (< 512K) and simple.
If the system initialization file isn't executed, the Device Manager will not be started. As a result, your keyboard and system console won't function.
Mandatory processes
When you're building an image, remember that there are two mandatory processes:
- the Process Manager/Microkernel (/boot/sys/Proc32)
- the system shared library (/boot/sys/Slib32)
To run 16-bit programs, you must include the 16-bit shared library /boot/sys/Slib16.
Disk images
For hard disk booting, you need to include:
- the two required system processes (Proc32 first and Slib32 second)
- the Filesystem Manager (Fsys)
- the driver required to access the drive (Fsys.driver)
The Makefile for disk booting
The Makefile for building boot images (under the directory /boot) contains an entry for making a generic hard disk boot image. When you build the OS image, default parameter values are used unless you enter new values when you invoke the make utility. To replace default values through make command-line arguments, you must first add the corresponding parameter markers to the build file. The following markers are defined in the Makefile for you to use in a build file:
| Marker: | make argument: | Default: | Description: |
|---|---|---|---|
| $b | b=buildfile | no default | build file |
| $d | d=driver | Fsys.ata | disk driver |
| $h | h=hard disk | /dev/hd0 | hard disk device |
| $i | i=imagefile | images/buildfile | image file |
| $p | p=parameters | no default | parameters supplied to disk driver |
| $t | t=tpartition_type | /dev/hd0t77 | QNX partition type |
When you override the default Makefile values through make command-line options, it's easy to forget which ones you specified next time you try to build the same OS image. To avoid this situation, prepare a custom build file for each machine and hardcode the required driver parameter values directly into the build file.
Examples
The values in the Makefile file are used unless you specify command-line options to override those values (as shown in the examples below) or you have a custom build file that defines the required parameters.
Use a build file called /boot/build/hard.1 and make an image called /boot/images/hard.1 that contains an AT-Attachment (ATA) fixed disk interface disk driver and a mount command that mounts a QNX filesystem on /dev/hd0t77:
make b=hard.1
Use a build file called /boot/build/hard.1 and make an image called /boot/images/hard.1 that contains an AHA 7 SCSI driver instead of the ATA driver and a mount command that mounts a QNX filesystem on the second hard drive detected:
make b=hard.1 d=Fsys.aha7scsi h=/dev/hd1
Use a build file called /boot/images/hard.1 and make an image called /boot/images/aha7 that contains an AHA 7 SCSI driver instead of the ATA driver and a mount command that mounts a QNX filesystem on second drive detected. The image is written to the image file aha7 rather than the default, which is the name of the b= option (in this case hard.1).
make b=hard.1 d=Fsys.aha7scsi h=/dev/hd1 i=aha7
Copying an image to /.boot
Once you've built an image, it won't become the new boot image until you copy it to the /.boot file. However, before you do this, you should make a backup of the current /.boot file by copying it to the /.altboot file:
cp /.boot /.altboot
When you select the alternate boot image, the normal check for the /etc/config/sysinit.node file is replaced by a check for the /etc/config/altsysinit file. You should ensure that the altsysinit file contains the latest copy of your working sysinit file:
cp /etc/config/sysinit.node /etc/config/altsysinit
Network images
For network booting, you need to include:
- the two required system processes (Proc32 first and Slib32 second)
- the Network Manager (Net)
- the driver required to access the network (Net.driver)
The build file for network booting
The following build file (/boot/build/ws.ether1000) contains parameter markers that inherit their values from the network environment:
sys/Proc32
$ 1 Proc32 -l $(lnode) -D

sys/Slib32
$ 1 Slib32

sys/Slib16
$ 1 Slib16

/bin/Net
$ 1 Net -m $(netmap)

/bin/Net.ether1000
$ 1 Net.ether1000

/bin/sinit
$ 1 sinit -r //$(bnode)/  TERM=ansi TZ=$(TZ)

sys/Debugger
$ 1 Debug
The $(lnode) marker in the Proc command takes as its value the logical node ID of a booting workstation. The logical node ID is determined by buildqnx based on the Ethernet address of the booting workstation and the workstation's mapping entry in the /etc/config/netmap file.
The $(netmap) marker in the Net command tells Net the initial network mapping of the booting workstation so that the boot server can start network communications with it.
The $(bnode) marker in the sinit command represents the logical node ID of the boot server. The command sets the root (/) of the booting workstation's filesystem to the root of the boot server.
The value of the $(TZ) marker is inherited from the boot server. The command sets the workstation's time zone information to match the current setting of the boot server's TZ environment variable.
When you boot over the network, you have the option of loading a pre-built image or building one on the fly. If you build an image on the fly — which is recommended — then you won't need to build one manually as shown above. This option is specified in the /etc/boot/netboot file and documented in the netboot utility man page.
Embedded images
An embedded image is required for embedded CPU systems. The term “embedded system” has different meanings to different people. QNX supports two general classifications of embedded systems:
- embedded PCs
- custom hardware
Embedded PCs
These are computerized controllers that behave just like a PC — they can have keyboards, screens, disks, or network cards connected to them. They're typically used in process control applications. Some of these systems have a small amount of flash memory available, either built into the CPU card (such as the Ziatech ZT8902) or available as a plug-in card (such as the Ampro MM/SSD).
The QNX Embedded Kit supports various CPU cards and flash cards. This support includes booting from the flash card (usually via some BIOS hook) and using the flash memory as a filesystem.
Custom hardware
These systems are custom designed to fit one specific application. They have a large amount of flash memory, no disk, and no network card. Most of these kinds of systems (e.g. Intel 386EX and AMD ELAN 386 processors) have no keyboard or screen. The QNX Embedded Kit provides support for some of the commonly used processor evaluation boards.
Selecting processes for an embedded image
You can modify the QNX Embedded Kit to support your particular hardware. Your embedded image should contain only the processes required to run the system. This image would then have to be transferred to the embedded system (most likely in ROM).