Disk & File Recovery
This chapter covers the following topics:
- Introduction
- Overview of QNX disk structure
- File maintenance utilities
- Disk recovery procedures
- What to do if your system will no longer boot
- Recovering lost files and directories
Introduction
The QNX filesystem achieves high throughput without sacrificing reliability. Although the filesystem is designed to be as robust as possible, there will always be situations in the real world where disk corruption will occur. Hardware will fail eventually, power will be interrupted, and users will no doubt reboot the computer at just the wrong time.
The QNX filesystem has been designed to tolerate such catastrophes. It is based on the principal that the integrity of the filesystem as a whole should be consistent at all times — any single failure will damage no more than the contents of files opened for writing at the time of a crash.
Effectively, this means that the most common types of failures — power failure, reboot, hard disk crash — usually leave the QNX filesystem intact.
If a crash occurs, you can use the following file maintenance and recovery utilities:
- fdisk
- dinit
- chkfsys
- dcheck
- zap
- spatch
These utilities will let you determine whether any damage was done to files that were open for writing at the time of the crash. These same utilities can also fix such damage, and in many cases will completely restore the filesystem.
Sometimes the damage may be more severe. For example, it's possible that a hard disk will develop a bad block in the middle of a file, or worse, in the middle of a directory or some other critical block.
Again, the utilities we've provided can help you determine the extent of such damage. You can often rebuild the filesystem in such a way as to avoid the damaged areas. In this case, some data will be lost, but with some effort, a large portion of the affected data may be recovered.
Overview of QNX disk structure
In this section, we describe how the QNX filesystem stores data on a disk. Reading this section should help you recognize and possibly correct filesystem damage if you ever have to rebuild a filesystem.
If you have a C development package, the header file sys/fsys.h contains the definitions for all terms used in this section.
For an overall description of the QNX filesystem, see the Filesystem Manager chapter in System Architecture.
Partition components
A QNX filesystem may be an entire disk (in the case of floppies) or it may be one of many partitions on a hard disk. Within a disk partition, a QNX filesystem contains the following components:
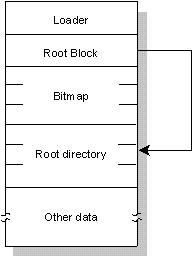
The following blocks are always found, in this order, on a QNX disk partition:
- loader block
- root block
- bitmap blocks
- root directory
Loader block
The first block of a QNX partition, the loader block contains the bootstrap loader that loads the QNX OS into memory.
Root block
The second block of a QNX partition, the root block contains the directory entry for the root (/), the inode entries for the inode file, and a label field.
Bitmap blocks
Several consecutive blocks follow the root block. The bitmap blocks form the bitmap for the QNX partition. One bit exists for each block on the partition, thus one bitmap block will be used for every 4096 disk blocks (corresponding to 2M of disk space).
If the value of a bit is zero, its corresponding block is unused. Unused bits at the end of the last bitmap block (for which there are no corresponding disk blocks) are turned on.
Bit assignments start with the least-significant bit of byte 0 of the first bitmap block — which corresponds to QNX block #1.
Root directory
The root directory follows the bitmap blocks. The root directory is a “normal” directory (see the “Directories” section). It is initially created by the dinit utility with enough room for 32 directory entries (4 blocks).
As the following illustration shows, the root directory (/) contains directory entries for several special files that always exist in a QNX filesystem. The dinit utility creates these files when the filesystem is first initialized.

| File: | Description: |
|---|---|
| /. | A link to the / directory |
| /.. | Also a link to the / directory |
| /.bitmap | Represents a read-only file consisting of the bitmap blocks. |
| /.inodes | A normal file of at least one block on a floppy/RAM disk and 16 blocks on other disks, /.inodes is a collection of inode entries. The first entry is reserved and used as a signature/info area. The first bytes of the .inode file are “IamTHE.inodeFILE”. |
| /.boot | Represents an OS image file that will be loaded into memory during the standard boot process. This file will be of zero length if no boot file exists. |
| /.altboot | Represents an OS image file that will be loaded into memory during the alternate boot process. This file will be of zero length if no alternate boot file exists. |
Directories
A directory is simply a file that has special meaning to the filesystem. A directory file contains a collection of directory entries as shown in the following illustration:
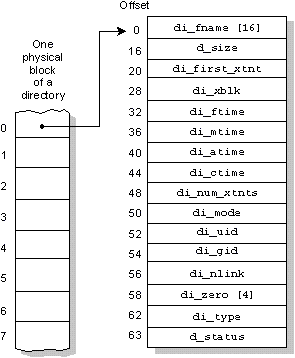
The type of directory entry is determined by the bits in the d_status field, as follows:
| Bit 3 (_FILE_LINK) | Bit 0 (_FILE_USED) | Comment: |
|---|---|---|
| 0 | 0 | unused directory entry |
| 0 | 1 | normal, used directory entry |
| 1 | 0 | link to an entry in /.inodes (which should be used) |
| 1 | 1 | invalid |
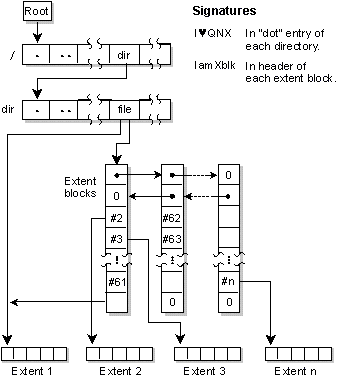
The first directory entry is always for the file “.” and includes a directory signature (“I[heart-symbol]QNX”). The hexadecimal equivalent of the [heart-symbol] character is 0x03. This entry refers to the directory itself by pointing to the entry within the parent directory that describes this directory.
The second entry is always for the “..” file. This entry refers to the parent directory by pointing to the first block of the parent directory.
Every directory entry either defines a file or points to an entry within the /.inodes file. Inode entries are used when the filename exceeds 16 characters or when two or more names are linked to a single file.
The first extent (if any) of a file is described in the directory/inode entry. Additional file extents require a linked list of extent blocks whose header is also in the directory/inode entry. Each extent block in the chain points to between 1 and 60 extents.
Links
Files with names greater than 16 characters long and links to other files are implemented with a special form of directory entry. These entries are identified with the _FILE_LINK bit (0x08) of the d_status field being set.
For these files, a portion of the directory entry is moved into the /.inodes file.
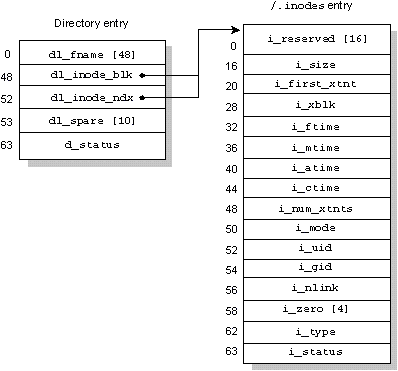
Extent blocks
Extent blocks are used for any file that has more than a single extent. The directory entry di_xblk points to one of these extent blocks, which in turn defines where the second and subsequent extents are to be found.
An extent block is exactly one 512-byte disk block with the following form:
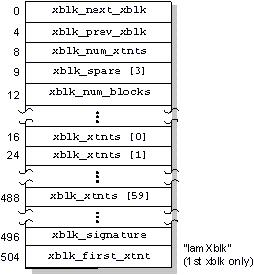
Each extent block contains:
- forward/backward pointers
- a count of extents
- a count of all the blocks in all the extents defined by this extent block
- pointers and block counts for each extent
- a signature (“IamXblk”)
The first extent block also contains a redundant pointer to the first file extent (also described within the directory/inode entry). This allows you to recover all data in the file by locating this block alone.
Files
Files or file extents are groupings of blocks described by directory/inode entries; they have no structure imposed on them by the QNX filesystem.
Most files in QNX have the following overall structure:
The fdisk utility creates and maintains the
partition block on a hard disk. This block is
compatible with other operating systems and may be
maintained by other OS versions of fdisk
(although ours has the advantage of recognizing QNX-specific
information). If the partition loader is missing or damaged,
fdisk can create it.
The dinit utility creates (but Fsys
maintains) the following:
The chkfsys utility is your principal filesystem
maintenance tool. This utility:
The chkfsys utility assumes that the root block
is valid. If the root block isn't valid, chkfsys
will complain and give up — you'll need to try
restoring the root block with the dinit utility.
The dcheck utility verifies that a disk has been correctly
formatted by attempting to read every block on the drive. When the
-m option is specified, dcheck removes any bad
blocks from the disk allocation bitmap (/.bitmap).
If the file /.bad_blks is found, dcheck
will update the bitmap and recreate the /.bad_blks
file. You can run dcheck a few times to increase your
chances of bad blocks being recognized and added to the
/.bad_blks file.
The zap utility lets you remove files or
directories from the filesystem without returning the used
blocks to the free list. You might do this for several
reasons, including the following:
If you zapped a file in error, it's sometimes possible to recover the
zapped file using the zap utility with the -u
option immediately after the deletion. You can recover a zapped file
using zap under these conditions:
The spatch utility lets you browse the raw disk
and patch minor problems. You can sometimes cure transient
disk problems by reading and writing the failing block with
spatch.
The chkfsys utility is your principal tool for
checking and restoring a potentially damaged filesystem. It
can identify and correct a host of minor problems as well as
verify the integrity of the entire disk system as a whole.
Normally, chkfsys requires that the filesystem be
idle and that no files be currently open on that device.
You'll have to shut down any processes that have opened
files or that may need to open files while
chkfsys is running.
To run chkfsys on a mount point, you'd simply type:
The utility scans the entire disk partition from the
root down, building an internal copy of the bitmap and
verifying the consistency of all files and directories it
finds in the process.
When it has finished processing all files, chkfsys compares
the internal bitmap to the bitmap on the disk. If they match,
chkfsys is finished. If any discrepancies are found,
chkfsys will — upon your approval — rewrite the
bitmap with data consistent with the files it was able to find
and verify.
In addition to verifying block allocation (bitmap),
chkfsys attempts to fix any problems it finds
during the scan. For example, chkfsys can:
It's a good idea to run chkfsys as part of your regularly
scheduled maintenance procedures — this lets you verify that the
data on your disk is intact. For example, you might consider running
chkfsys on your network servers every time they boot. An
automated check on the filesystem at boot time guarantees that
chkfsys will attempt to fix any problems it finds during
the scan. To automate this process, add chkfsys to the
server's sysinit.node file.
It's especially important to run chkfsys after a system
crash, power outage, or unexpected system reboot so that you can
identify whether any files have been damaged. The chkfsys
utility checks the “clean” flag on the disk to determine
whether the system was in a constant state at the time.
The clean flag is stored on disk and is maintained by the system. It's
turned off whenever a file is opened for update and is reasserted
after all open files have been closed and the associated data has been
flushed from cache to disk. When the clean flag is set,
chkfsys assumes that the filesystem is intact. If
chkfsys finds the clean flag off, it tries to fix the
problem.
The chkfsys utility supports a -u option, which
overrides a set clean flag and tells chkfsys to run
unconditionally. You might want to override the clean flag when:
The chkfsys utility normally requires exclusive use of the
filesystem to provide a comprehensive verification of the
disk.
If you're running an application that can't afford downtime or
you couldn't run chkfsys because files were open for
updating, try to run chkfsys with the -f option:
This invokes a special read-only mode of chkfsys. It will
give you a feeling for the overall sanity of your filesystem.
Hard disks occasionally develop bad blocks as they age. In
some cases, you might be able to recover most or even all
the data in a file containing a bad block.
Some bad blocks are the result of power failures or of weak
media on the hard disk. In these cases, sometimes simply
reading then rewriting a block will “restore”
the block for a short period of time. This may allow you to
copy the entire file somewhere else before the block goes
bad again. This procedure certainly can't hurt, and is
often worth a try.
To examine the blocks within a file, you use the
spatch utility. When you get to a bad block,
spatch should report an error, but it may have
actually read a portion of “good” bytes from
that block. Writing that same block back will often succeed.
At the same time, spatch will rewrite a correct
CRC (Cyclic Redundancy Check) that will make the block good
again (but with possibly incorrect data).
You can then copy the entire file somewhere else, and then
zap the previously damaged file. To complete the
procedure, you mark the marginal block as bad (by adding it
to the /.bad_blks file), then run
chkfsys to recover the remaining good blocks.
If this procedure fails, you can use the spatch
utility to copy as much of the file as possible to another
file, and then zap the bad file and run
chkfsys.
If a previously working QNX system suddenly stops working
and will no longer boot, then one of the following may have
occurred:
The following steps can help you identify the problem. Where
possible, corrective actions are suggested.
Step 1 — Try booting from floppy or across the network
If you have a network to boot over, try booting your machine
over the network. Once the machine is booted, you'll need to
log in as root and then start up a local
filesystem:
If you don't have a network, you'll need
to boot from the QNX boot floppy that was used to install your
system onto the hard disk. The filesystem will already be running
in this case, and you'll be logged in as root.
Step 2 — Start the hard disk driver
You now have to start the appropriate hard disk driver. For example,
to start a disk connected to an Adaptec series 4 SCSI adapter, you
would type:
If you're using another type of driver, enter its name instead.
This should create a block special file called
/dev/hd0 that represents the entire hard
disk.
Step 3 — Run fdisk
Running the fdisk utility will immediately give
you useful information about the state of your hard disk.
The fdisk utility might report one of several
types of problems:
Step 4 — Mount the partition and the filesystem
At this point, you have verified that the hardware is working (at
least for block 1) and that a valid partition is defined for QNX. You
now need to create a block special file for the QNX partition itself
and to mount the block special file as a QNX filesystem:
This should create a volume called
/dev/hd0t77. Depending on the state of the QNX
partition, the mount may or may not fail. If the partition
information is correct, there shouldn't be any problem. Since the root
(/) already exists (on a floppy or on a remote disk on
the network), we've mounted the local hard disk partition as a
filesystem with the name /hd.
Your goal now would be to run the chkfsys utility on the
disk to examine — and possibly fix — the
filesystem.
If you run this command, you can skip the rest of this
section. If the mount fails, the first portion of the QNX
partition is probably damaged (since Fsys will
refuse to mount what it considers to be a corrupted
filesystem).
In this case, you can use the dinit utility to
overlay enough good information onto the disk to satisfy
Fsys:
The -r option tells dinit to rewrite:
After doing this, you'll need to rebuild the bitmap with
chkfsys, even on a good partition.
You should now be able to reissue the mount
command and once again try to create a mount point for a QNX
filesystem called /hd.
Step 5 — Run chkfsys
At least a portion of your QNX filesystem should now be
accessible. You can use chkfsys to examine the
filesystem and recover as much data as possible.
If the machine boots from floppy, enter:
If the machine boots over the network, enter:
In either case, you should make note of any problems
reported and allow chkfsys to fix as much as it
can. What you do next depends on the result of running
chkfsys.
If, for any reason, your disk is completely unrecoverable,
read the next section, “Recovering lost files and
directories.” In some cases, you may need to
reinstall QNX from floppy and restore your disk from your
backup files.
If significant portions of the filesystem are irreparably
damaged, or important files are lost, then restoring from
backup might be your best alternative.
If your filesystem is intact, yet the machine still refuses
to boot from hard disk, then either of the following is
probably damaged:
To rewrite a partition loader, use fdisk:
To rewrite the QNX loader, use dinit:
You should now be able to boot your system.
You may sometimes find that files or directories have been
completely lost due to disk corruption. If after running
chkfsys you know that certain key files or
directories were not recovered, then you might be
able to use spatch to recover some or all of this
data.
Before attempting this, you should first familiarize yourself with the
details of a QNX filesystem (see “Overview of QNX disk structure” in
this chapter). You should also study the documentation for the
spatch utility in the Utilities Reference.
File maintenance utilities
fdisk
dinit
chkfsys
dcheck
zap
Recovering a zapped file
spatch
Disk recovery procedures
Using chkfsys
chkfsys /
When to run chkfsys
Using chkfsys on a live system
chkfsys -f /dev/hd0t77
Recovering from a bad block in the middle of a file
What to do if your system will no longer boot
Fsys &
Fsys.aha4scsi &
Problem: Probable cause: Remedy: Error reading block 1 Either the disk controller or the hard disk itself has
failed. If the disk is good, replacing the controller card
might let you continue using the disk. Otherwise,
you'll have to replace the hard drive, reinstall QNX, and
restore your files from backup. Wrong disk parameters Your hardware has probably “lost” its
information about this hard drive — likely because the
battery for the CMOS memory is running low. Rerunning the hardware setup procedure (or the
programmable option select procedure on a PS/2) will
normally clear this up. Of course, replacing the battery
will make this a more permanent fix. Bad partition information If the disk size is reported correctly by
fdisk, but the partition information is wrong,
then the data in block 1 of the physical disk has somehow
been damaged. Use fdisk to recreate the correct partition
information. It's a good idea to write down or print out a
hard copy of the correct partition information in case you
ever have to do this step.
mount -p /dev/hd0 /dev/hd0t77 /hd
/hd/bin/prefix -R /=/hd/
dinit -hr /dev/hd0t77
/hd/bin/chkfsys /
chkfsys /
If the disk is unrecoverable
If the filesystem is intact
fdisk /dev/hd0 loader
dinit -b /dev/hd0t77
Recovering lost files and directories